Tracking Tag
Learn how to install and verify the AnyTrack Tracking Tag on your website. Covers installation methods (direct HTML, Google Tag Manager, WordPress, WooCommerce), tag verification with the Tracking Tag Helper extension, and how AutoTrack collects engagement events like outbound clicks, form submissions, and page views automatically.
The Tracking Tag is your conversion tracking foundation. One lightweight script in your site’s <head> section starts collecting every click, page view, and conversion — automatically sending enriched data to all connected ad platforms.
Browser-side tracking catches user behavior in real-time. Server-side sync ensures conversions reach ad platforms even when browsers block tracking or users have strict privacy settings. Install once, track everywhere.
Why the Tracking Tag Matters
Section titled “Why the Tracking Tag Matters”Ad platforms need consistent, real-time signals to optimize campaigns. The Tracking Tag collects first-party data (cookies, session IDs, browser fingerprints) that survives privacy restrictions and provides the identity resolution needed for accurate attribution across sessions and devices.
Overview
Section titled “Overview”The Tracking Tag collects campaign identifiers (from the UTM Tracking Template) assigned to a visitor after clicking on an ad. Therefore, it must be present on the landing page as well as any other pages involved in the customer journey. Additionally, the Tracking Tag assigns a client ID to the arriving visitor and generates the Click ID if the visitor triggers a conversion event.
The Tracking Tag also initializes the anytrack function, which is essential for generating the atclid and monitoring client-side events, such as outbound clicks, form submissions, pageviews, and Custom Event Tracking triggered via event codes.
Furthermore, the Tracking Tag orchestrates all your connected ad pixels and ensures the functionality of your installed integrations. Another key use of the Tracking Tag is AutoTag, which appends tracking parameters to links from affiliate offers and eCommerce platforms for accurate tracking.
Therefore, it is essential to verify your tag is set across your funnels.
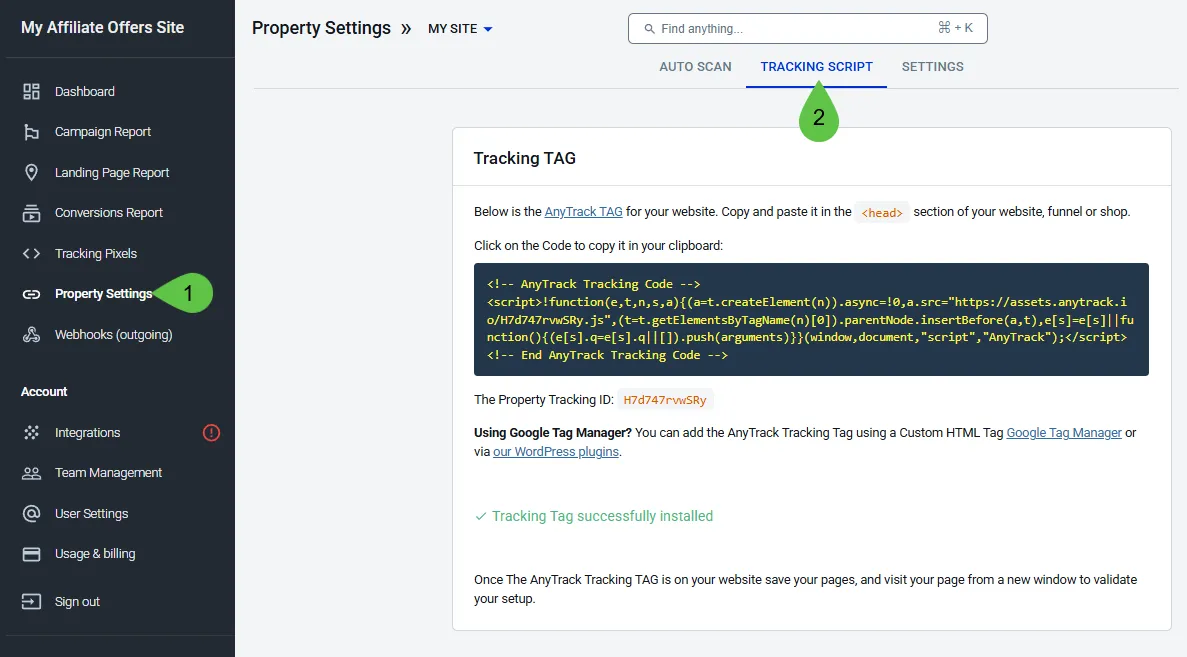
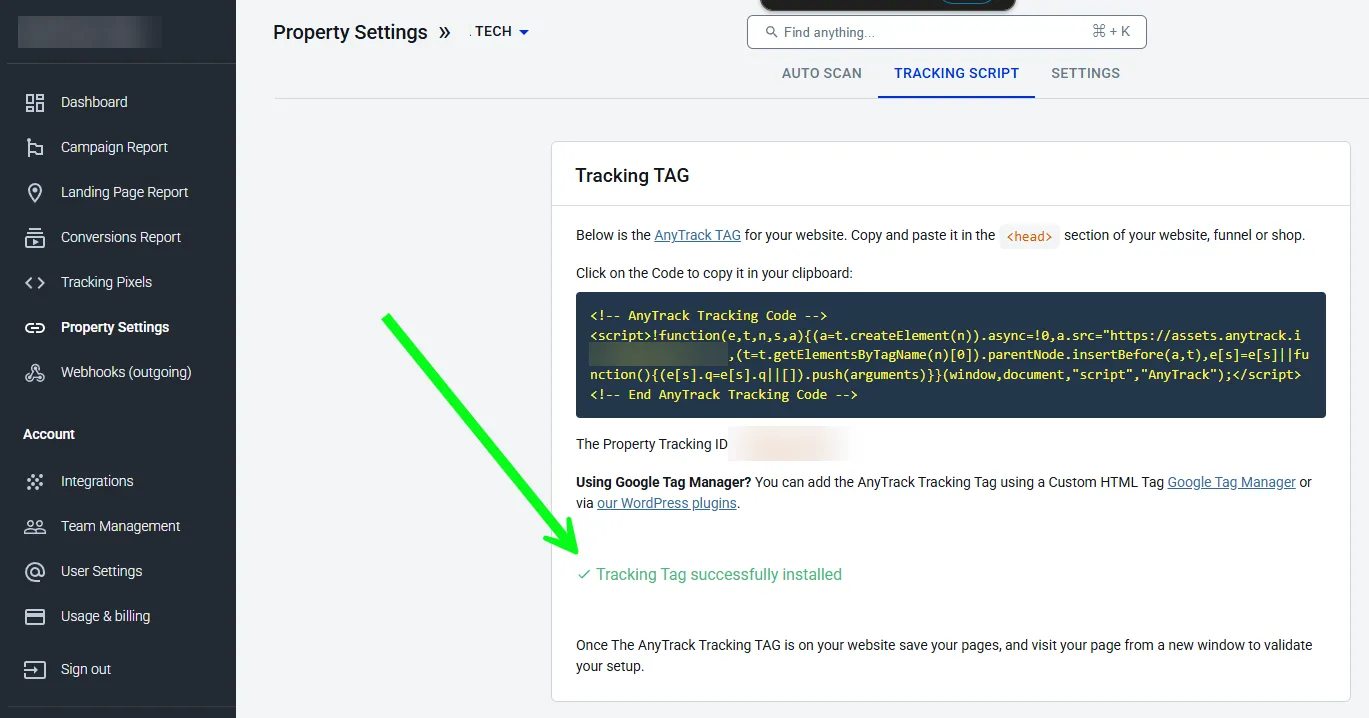
Tracking Tag Example
Section titled “Tracking Tag Example”<script>! function(e, t, n, s, a) { (a = t.createElement(n)) .async = !0, a.src = "https://assets.anytrack.io/XXXXXXXXX.js", (t = t.getElementsByTagName(n)[0]) .parentNode.insertBefore(a, t), e[s] = e[s] || function() { (e[s].q = e[s].q || []) .push(arguments) }}(window, document, "script", "AnyTrack");</script>Find your Tracking Tag
Section titled “Find your Tracking Tag”The Tracking Tag is specific to your AnyTrack property. To find your Tracking Tag, after creating a new property navigate to Property Settings and select the Tracking Script tab.
Installing the Tracking Tag
Section titled “Installing the Tracking Tag”There are different methods to install the Tracking Tag on your website, they all have the same purpose to place the code in the <head> section.
| Setup method | When should you use this method | Instructions |
|---|---|---|
Add the Tag directly in the head section of your website. | Custom coded websites | Custom |
| Use the Tag management system of your website builder (ClickFunnels, GoHighLevel, etc.). | When a built-in option for scripts is available. | In the integration article. |
| Using Google Tag Manager | When you are already using GTM for tag management. | Article |
| WordPress Plugin | When you have a WordPress site (but not WooCommerce) | Article |
| WooCommerce Plugin | When you run an eCommerce website on WooCommerce. Learn how to set up the AnyTrack for WooCommerce plugin. | Article |
Verify Your Tracking Tag Installation
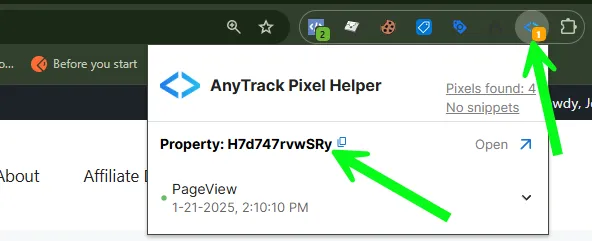
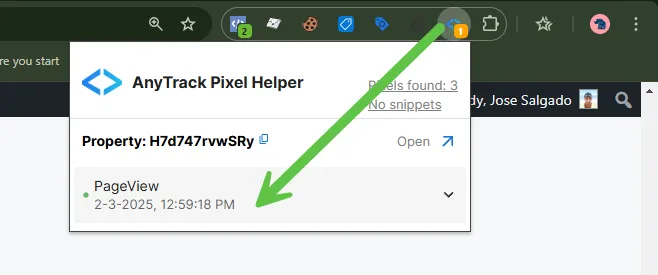
Section titled “Verify Your Tracking Tag Installation”Regardless of the method used, please verify your Tracking Tag installation by checking for the success message in Property Settings and by using the Tracking Tag Helper.
You should also use the Tracking Tag Helper to verify your Tracking Tag presence and for general troubleshooting. AnyTrack Chrome Extension documentation. If the extension icon turns blue, a Tracking Tag was found. Click on it to display your Property Tracking ID.
AutoTrack Function for Engagement Events
Section titled “AutoTrack Function for Engagement Events”What Are Engagement Events
Section titled “What Are Engagement Events”Engagement events are events that occur on your site, such as outbound clicks and form submissions. They are considered as “micro-conversions” since they give an indication of how your audience engages with your website content.
AutoTrack is a function provided in the Tracking Tag that automatically sends engagement events such as outbound clicks and form submissions to your analytics and ad platforms.
Outbound Clicks
Section titled “Outbound Clicks”Outbound clicks are usually links that point to external URLs such as affiliate links. By default, AnyTrack will track and send these events to your analytics and pixels.
In addition, links with the attribute rel="nofollow" or rel="sponsored" will trigger an OutboundClick event which will be sent to your pixels and analytics. Learn about Link tracking.
Any standard form submission occurring on your site will generate a formSubmit event in AnyTrack, which will be sent to your analytics and pixels. Learn about Form Tracking.
Page views
Section titled “Page views”The Tracking Tag will record a PageView event every time a visitor loads the page or lands on the page. You can see the event with the Tracking Tag Helper.
FAQ and Troubleshooting
FAQ was last reviewed on 2026-07-19