AnyTrack Property
Learn how to configure the AnyTrack Property in the AnyTrack dashboard. Understand property settings, cross-domain tracking, and how to manage your tracking configuration for accurate conversion attribution.
What is an AnyTrack Property?
Section titled “What is an AnyTrack Property?”An AnyTrack Property is a container that tracks all conversions and user interactions for a single website or app. Think of it as a tracking workspace for one specific website.
Each Property includes:
- Unique Property ID — Identifies your tracking data
- Dedicated Tracking Tag . JavaScript code installed on your website
- Separate reports . Campaign Report and Conversions Report specific to your website
- Custom settings . Timezone, currency, and tracking preferences
Why Create a Property?
Section titled “Why Create a Property?”Organize Your Tracking . Keep conversion data separate for each website. Reports become clearer and more actionable.
Customize Settings . Set the right timezone and currency for each website’s location and audience.
Scale Your Tracking . Track conversions across multiple websites, landing pages, or apps without mixing data together.
When to Create a Property
Section titled “When to Create a Property”Create a separate Property for each:
- ✅ Different website domain (example.com vs. blog.example.com)
- ✅ Separate business or brand
- ✅ Different conversion tracking needs (eCommerce vs. lead generation)
- ✅ Mobile app (separate from website)
Use the same Property for:
- ✅ Different pages on the same website
- ✅ Subdomains that are part of the same user journey (www.example.com and checkout.example.com)
- ✅ Different marketing campaigns on the same website
Website Types Supported
Section titled “Website Types Supported”AnyTrack Properties work with any website type:
Affiliate Marketing . Track clicks and conversions from multiple affiliate programs.
eCommerce . Track product views, add-to-cart events, and purchases with revenue data.
Lead Generation . Track form submissions, phone calls, and other lead conversion events.
Content & Publishing . Track ad clicks, affiliate promotions, and user engagement.
SaaS & Web Apps . Track sign-ups, trial starts, and subscription conversions.
Landing Pages . Track single-page funnels for specific campaigns or offers.
Understanding Your Property ID
Section titled “Understanding Your Property ID”Your Property ID is a unique identifier that connects your website to your AnyTrack account.
Locate Your Property ID
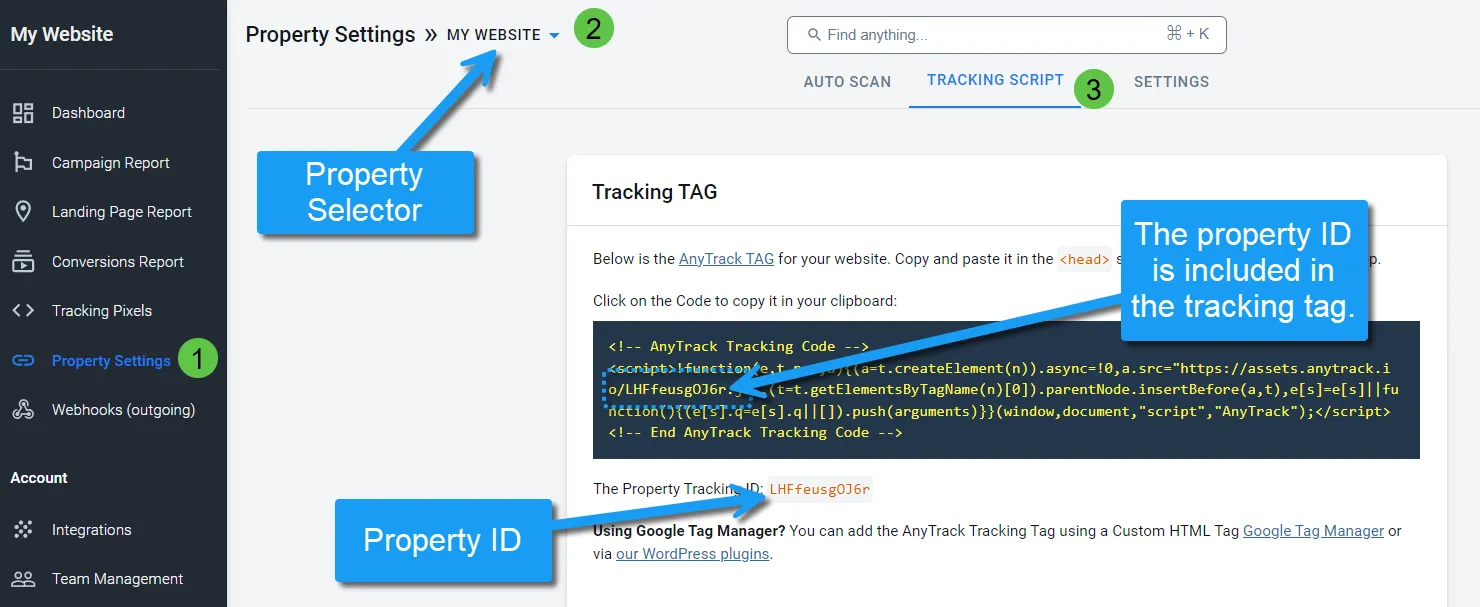
Section titled “Locate Your Property ID”- Open your AnyTrack Dashboard
- Click Property Settings in the left sidebar
- Select your Property from the dropdown (if you have multiple)
- Click the Tracking Script tab
- Your Property ID appears in the tracking code
When You Need Your Property ID
Section titled “When You Need Your Property ID”- Installing the Tracking Tag . The Property ID is embedded in your tracking script
- Troubleshooting . Support may ask for your Property ID to investigate issues
- API integrations . Some integrations require your Property ID for setup
Managing Multiple Properties
Section titled “Managing Multiple Properties”If you track multiple websites, you can create a separate Property for each one.
Benefits of Multiple Properties
Section titled “Benefits of Multiple Properties”Separate Reporting . Each website has its own conversion reports. See performance by site easily.
Different Settings . Set different timezones, currencies, and tracking preferences per website.
Team Access Control . Grant team members access to specific Properties (Business plans).
Clearer Attribution . Avoid cross-site data contamination in reports.
Switching Between Properties
Section titled “Switching Between Properties”Use the Property Selector in the dashboard to switch between Properties:
- Click the Property name in the top navigation
- Select the Property you want to view
- All reports and settings update to show that Property’s data
Setup Steps After Creating a Property
Section titled “Setup Steps After Creating a Property”1. Configure Property Settings
Section titled “1. Configure Property Settings”Set timezone, currency, and tracking preferences:
2. Install the Tracking Tag
Section titled “2. Install the Tracking Tag”Add the AnyTrack Tracking Script to your website:
- Copy your tracking script from Property Settings > Tracking Script
- Install it in the
<head>section of every page - Use Google Tag Manager, WordPress plugin, or direct installation
Install AnyTrack Tracking Tag →
3. Connect Your Data Sources
Section titled “3. Connect Your Data Sources”Connect platforms where conversions occur:
- Affiliate networks (ClickBank, Impact, CJ)
- eCommerce platforms (Shopify, WooCommerce)
- Ad platforms (Google Ads, Meta Ads, TikTok Ads)
4. Verify Tracking
Section titled “4. Verify Tracking”Test that data flows correctly:
- Use AnyTrack Pixel Helper to verify tag installation
- Check Property Settings for green checkmark
- View recorded events in near real time in the Conversions Report
Property Settings
Section titled “Property Settings”Customize these Property settings:
Basic Settings
- Property name
- Website URL
- Timezone
- Currency
Tracking Settings
- AutoTag (automatic link tagging)
- AutoScan (scan for links in redirects)
- Cross-domain tracking
- Event tracking preferences
Advanced Settings
- Custom domains
- Data retention
- Team access (Business plans)
Common Questions
Section titled “Common Questions”Common Questions
FAQ was last reviewed on 2026-07-25
Can I use one Property for multiple websites?
How many Properties can I create?
Can I delete a Property?
Can I rename a Property?
What happens if I downgrade my plan?
Get Started
Section titled “Get Started”- Create Your First Property . Set up tracking for your website
- Configure Property Settings . Customize timezone, currency, and preferences
- Install the Tracking Tag . Add tracking code to your website
- Connect Integrations . Link affiliate networks and ad platforms
Related Resources
Section titled “Related Resources”Getting Started
Section titled “Getting Started”- Create a Property . Step-by-step setup guide
- Property Settings . Configure your Property
- Install AnyTrack Tracking Tag . Add tracking to your website
- Verify Setup . Test your tracking
Property Management
Section titled “Property Management”- Delete a Property . Remove a Property permanently
- AutoScan Feature . Automatic link scanning
- Cross-Domain Tracking . Track across multiple domains
Reports & Data
Section titled “Reports & Data”- Campaign Report . View traffic source performance
- Conversions Report . Analyze conversion data
- Integration Catalog . Connect data sources
Support
Section titled “Support”- AnyTrack Pixel Helper . Verify tracking installation
- Contact Support . Get help from our team