Shopify Integration
The AnyTrack Shopify integration streamlines conversion tracking and attribution for eCommerce stores by automatically tracking purchases and key events, and sending data to platforms like Google Ads, Facebook Conversion API, and TikTok Ads.
Shopify Integration overview
The AnyTrack Shopify integration simplifies conversion tracking and attribution for your eCommerce store. With a straightforward installation process, it automatically tracks purchases and key events, sending data to platforms like Google Ads, Facebook Conversion API (Application Programming Interface), and TikTok Ads. By leveraging first-party data, AnyTrack enhances Event Match Quality and ensures accurate attribution while maintaining privacy. This integration empowers businesses to build better audiences and improve marketing performance across multiple channels.
How the Shopify AnyTrack integration works:
- Traffic: When visitors land on your website, AnyTrack collects traffic source data and First Party data.
- Customer Journey Tracking: During the customer journey, AnyTrack automatically tracks events such as
ViewContent,AddToCart, andInitiateCheckoutthrough the AnyTrack Tracking Tag.- Collects and sends product data such as sku, price, quantity and name.
- Sends hidden tracking parameter to the cart object.
- Triggers the corresponding events such as
AddToCartto the AnyTrack API which instantly forwards to your Ad Platform's Conversion API.
- Shopify Webhooks: AnyTrack also receives customer journey events via Shopify Webhook notifications and sends them to the Ad Platforms' conversion API.
- Conversions: When customers complete their
purchase, AnyTrack processes the conversion data (including customer data and product data). - Attribution: AnyTrack processes the conversion data and reports it across various reporting sections of the AnyTrack Dashboard.
- Conversion API: AnyTrack then sends your conversions to your Ad Platforms' Conversion API to feed your ad platform's Machine Learning, AI and automatic optimization with 100% of your conversion data.
Technical details
| Reference | Value | Information |
|---|---|---|
| Tracking Group | shopify | The Tracking Group reference can be used to activate AutoTag. |
| Subid Parameter | atclid | The Subid Parameter used to pass the AnyTrack click_id. |
| Tracking Method | Webhook | - |
Shopify standard customer journey events
AnyTrack automatically tracks standard eCommerce customer journeys and feeds the event data to your ad platforms so that you can create advanced behavioral audiences and improve attribution.
Good to know:Each ad platforms integration has its own Event Mapping which AnyTrack handles automatically for you.
| Shopify | AnyTrack | GA4 | Details | |
|---|---|---|---|---|
item_view | ViewContent | ViewContent | view_item | When a visitor views a product. |
cart/create | AddToCart | AddToCart | add_to_cart | When a visitor adds a product to its cart. |
checkout/create | InitiateCheckout | InitiateCheckout | begin_checkout | When a visitor starts a checkout. |
checkout/update | AddPaymentInfo | AddPaymentInfo | add_payment_info | When a visitor adds its payment details. |
orders/create | Purchase | Purchase | purchase | When a visitor completes a purchase. |
Shopify sends conversions to AnyTrack using Webhooks notifications
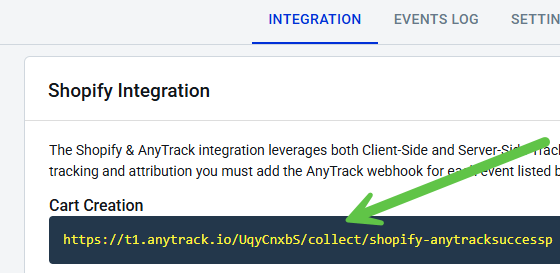
AnyTrack provides a pre-defined webhook that you can implement with your Shopify account.
https://t1.anytrack.io/hBtoE3hN/collect/shopify
Before you beginYou must install the AnyTrack Tracking Tag in the
headsection of your website or landing pages. Learn how to Install the AnyTrack Tag on your shop.
Shopify setup guide
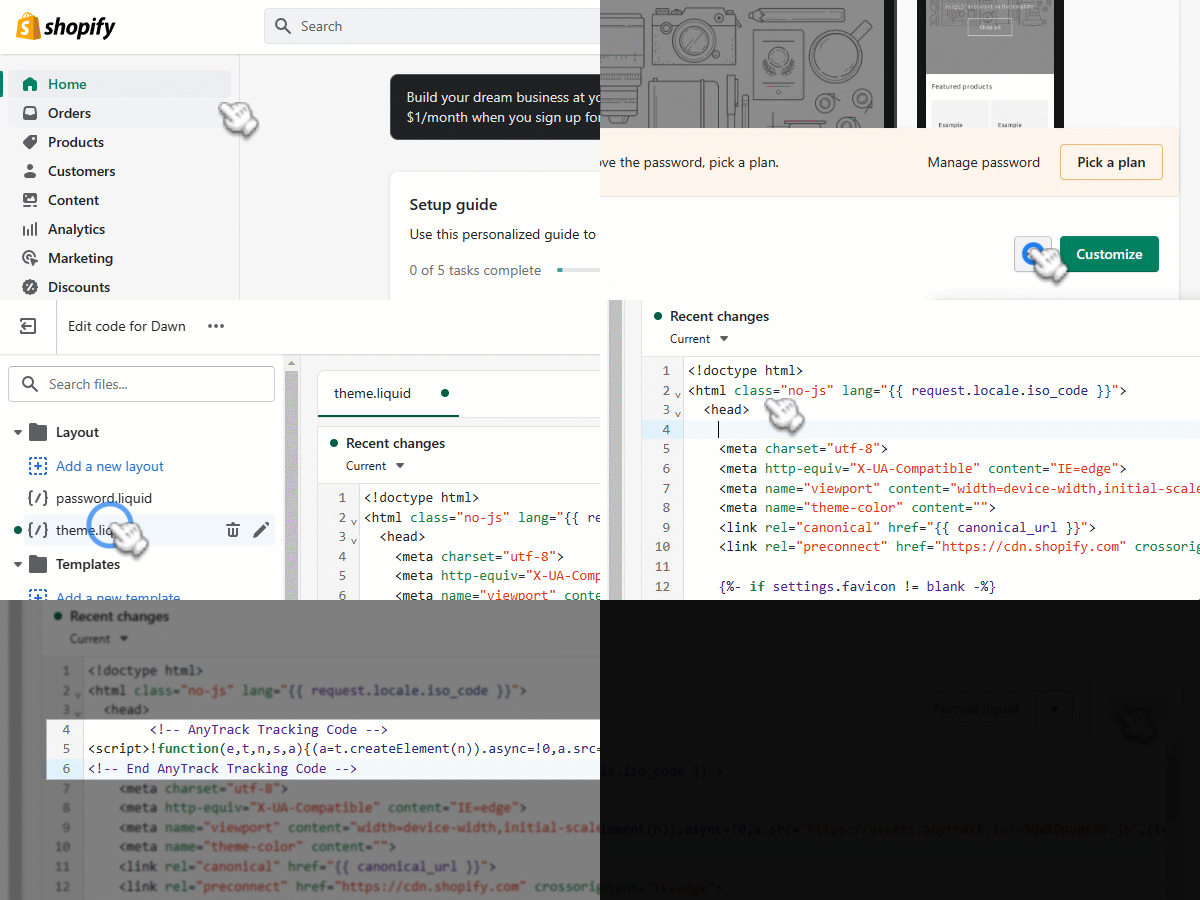
Step #1: Add the AnyTrack Tag to your Shopify theme
-
Create a New Property in AnyTrack.
-
Set the Shop Name and URL (the root domain) and click Next.
-
Copy the AnyTrack Tracking Tag.
-
Open the Shopify Admin and Edit the Theme Code.
-
Select the Theme Liquid File and Paste the Tracking Tag in the
headsection. -
Save the Theme Liquid file.

Add the Anytrack tracking tag to the Shopify theme
-
Use the AnyTrack Pixel Helper Chrome extension to verify that AnyTrack has correctly installed the Tag.
-
Return to AnyTrack and adjust the property settings
- Time Zone: Match your shop time zone to avoid discrepancies.
- The Base Currency: Set the currency you want the dashboard to reflect. AnyTrack will convert any revenues into your base currency.
- Client Side Tracking Settings: Leave the default settings, which deliver optimal performance.
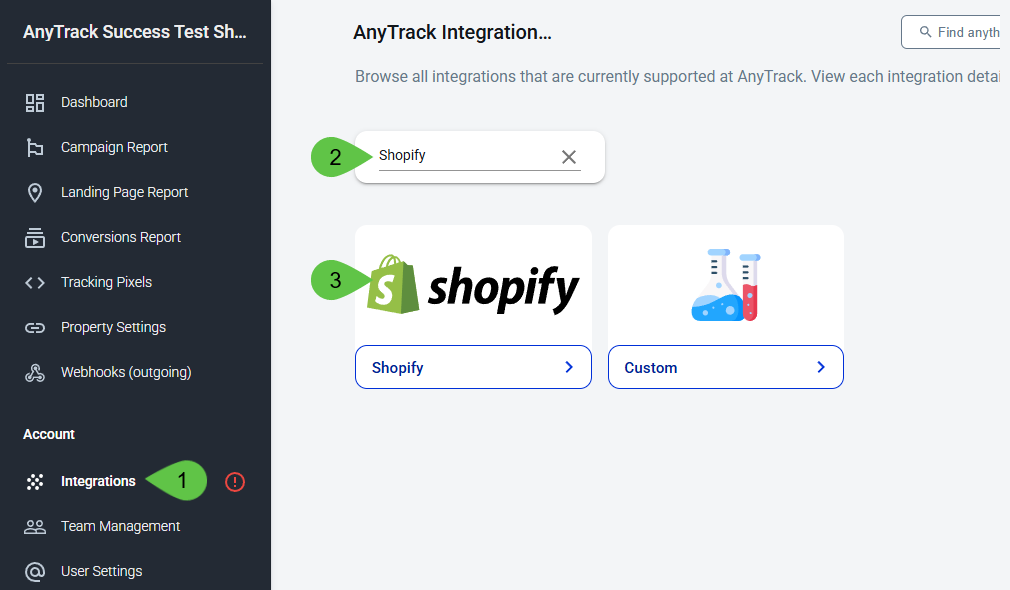
Step #2: Add Shopify to your AnyTrack Account
-
Go to the Integration Catalog and search for Shopify. Then click on the Shopify card.

-
Click on Install Integration.
- Fill the Name enter a name (e.g. MyShopify)
- Fill the URL of your shop or the shopify admin login url and click Create

Step #3: Connect your Shopify Customer Events
-
Copy the Webhook URL from the integration

-
Go to your Shopify Admin Panel
-
Navigate to Settings >> Notifications
-
Scroll down to the Webhooks section and click on "Create webhook"
- Select the events according to the list of required events:
- Leave the format as
JSON - Paste the Webhook
- Update the Webhook version to the Latest
- Click on "Save webhook"
Repeat these steps for all (5) events listed on the Integration page.Watch this Video to Learn How to Add the Webhook Notifications On Shopify
Step #4: Connect AnyTrack with Facebook Ads
Now that your shop connects with AnyTrack and tracks your customer journeys, you need to configure AnyTrack to send them to your Ad Platform's Conversion API such as Facebook, TikTok or Google Ads.
Good to know:The FB Ads integration occurs via the AnyTrack Dashboard and does not require any setup on the Shopify Admin.
- Navigate to Tracking Pixels
- Click on the Facebook Pixel Card
- Click on the button Browse to connect to your Facebook Business Manager.
- Select the Facebook Pixel and Facebook Manager
- Click Next
- Now click on Connect to open a connection with your Ad Account
- Enable the Facebook Conversion API
- Scroll down and Save.
- Now Open the Ads Integration Tab (scroll up to the top of the screen)
- Click on the UTM (Urchin Tracking Module) Tracking Template
- Add the Template to your Facebook Ads
Connect other ad accountsAccess other ad platforms integrations to connect your other ad accounts.
ReminderYou must disconnect any other direct integrations that currently send conversions to your ad platforms or you will generate duplicate data in your ad accounts.
Validate your integration
This section will enable you to validate the main aspects of your setup.
Conversion Tracking
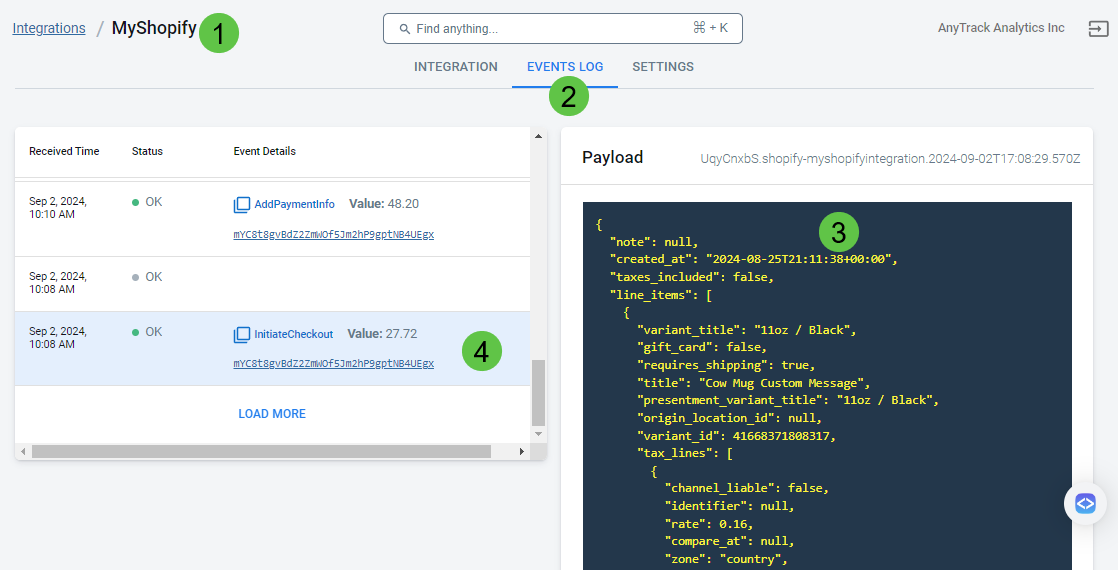
To validate your setup, wait for a conversion or trigger a test conversion yourself and inspect the conversion logs.

Inspect the Events Log to see the conversions arriving from Shopify.
Shopify conversion payload example
{
  "note": null,
  "created_at": "2024-08-25T21:11:38+00:00",
  "taxes_included": false,
  "line_items": [
    {
      "variant_title": "11oz / Black",
      "gift_card": false,
      "requires_shipping": true,
      "title": "Cow Mug Custom Message",
      "presentment_variant_title": "11oz / Black",
      "origin_location_id": null,
      "variant_id": 41668371808317,
      "tax_lines": [
        {
          "channel_liable": false,
          "identifier": null,
          "rate": 0.16,
          "compare_at": null,
          "zone": "country",
          "price": "1.91",
          "position": 1,
          "source": "Shopify",
          "title": "VAT"
        }
      ],
      "vendor": "Printify",
      "price": "11.95",
      "product_id": 7473336549437,
      "rank": null,
      "presentment_title": "Cow Mug Custom Message",
      "grams": 100,
      "sku": "24675843150437141759",
      "key": "41668371808317",
      "unit_price_measurement": {
        "quantity_unit": null,
        "reference_value": null,
        "reference_unit": null,
        "quantity_value": null,
        "measured_type": null
      },
      "line_price": "11.95",
      "quantity": 1,
      "compare_at_price": null,
      "fulfillment_service": "printify",
      "taxable": true,
      "variant_price": "11.95",
      "user_id": null,
      "destination_location_id": null,
      "applied_discounts": [],
      "properties": {
        "_atclid": "mYC8t8gvBdZ2ZmWOf5Jm2hP9gptNB4UEgx"
      }
    },
    {
      "variant_title": "11oz / Yellow",
      "gift_card": false,
      "requires_shipping": true,
      "title": "Copy of Colorful Mugs, 11oz",
      "presentment_variant_title": "11oz / Yellow",
      "origin_location_id": null,
      "variant_id": 41668371415101,
      "tax_lines": [
        {
          "channel_liable": false,
          "identifier": null,
          "rate": 0.16,
          "compare_at": null,
          "zone": "country",
          "price": "1.91",
          "position": 1,
          "source": "Shopify",
          "title": "VAT"
        }
      ],
      "vendor": "Printify",
      "price": "11.95",
      "product_id": 7473336156221,
      "rank": null,
      "presentment_title": "Copy of Colorful Mugs, 11oz",
      "grams": 100,
      "sku": "14097861709805790604",
      "key": "41668371415101",
      "unit_price_measurement": {
        "quantity_unit": null,
        "reference_value": null,
        "reference_unit": null,
        "quantity_value": null,
        "measured_type": null
      },
      "line_price": "11.95",
      "quantity": 1,
      "compare_at_price": null,
      "fulfillment_service": "printify",
      "taxable": true,
      "variant_price": "11.95",
      "user_id": null,
      "destination_location_id": null,
      "applied_discounts": [],
      "properties": {
        "_atclid": "mYC8t8gvBdZ2ZmWOf5Jm2hP9gptNBCIGGr"
      }
    }
  ],
  "source": null,
  "buyer_accepts_marketing": false,
  "presentment_currency": "USD",
  "total_weight": 200,
  "location_id": null,
  "source_url": null,
  "landing_site": "/",
  "source_identifier": null,
  "total_discounts": "0.00",
  "updated_at": "2024-09-02T10:08:28-07:00",
  "referring_site": null,
  "tax_lines": [
    {
      "title": "VAT",
      "rate": 0.16,
      "price": "3.82"
    }
  ],
  "customer_locale": "en-MX",
  "total_duties": "0.00",
  "currency": "USD",
  "id": 40881068146749,
  "shipping_address": [],
  "abandoned_checkout_url": "https://reallycoolmugs.com/60566175805/checkouts/ac/Z2NwLXVzLWNlbnRyYWwxOjAxSjY1UDJOUkRTSEFKODg1R0JWUDFHRkNW/recover?key=f8ca9fced0c636e847a6587e2bd56883",
  "email": null,
  "source_name": "web",
  "subtotal_price": "23.90",
  "closed_at": null,
  "total_price": "27.72",
  "device_id": null,
  "total_line_items_price": "23.90",
  "total_tax": "3.82",
  "token": "c6776b241387613dcea880161508f9c3",
  "completed_at": null,
  "shipping_lines": [],
  "phone": null,
  "user_id": null,
  "note_attributes": [
    {
      "name": "__atclid",
      "value": "mYC8t8gvBdZ2ZmWOf5Jm2hP9gptNBCIGGr"
    }
  ],
  "name": "#40881068146749",
  "cart_token": "Z2NwLXVzLWNlbnRyYWwxOjAxSjY1UDJOUkRTSEFKODg1R0JWUDFHRkNW",
  "sms_marketing_phone": null,
  "buyer_accepts_sms_marketing": false,
  "discount_codes": [],
  "gateway": null,
  "x-shopify-shop-domain": "0ae3b8-c6.myshopify.com",
  "x-shopify-webhook-id": "aa6ec748-99ef-4c09-bbe6-76ab3826619d",
  "x-shopify-hmac-sha256": "iOURkLD5PwvvyObxG41Yr0hF4MGCpPdDvg/wfNFUpQk=",
  "x-shopify-topic": "checkouts/create",
  "x-shopify-event-id": "ec7a55d5-6602-4615-ba5f-6b2448ee30fa",
  "x-shopify-triggered-at": "2024-09-02T17:08:28.689567681Z",
  "x-shopify-api-version": "2024-07"
}
FAQ & troubleshooting for the Shopify integration
-
No. AnyTrack can only ingest conversions that have been triggered following a visitor session on your website.Can I import past conversions into AnyTrack? -
Per Shopify's documentation, any line item property value beginning with an underscore (e.g.,How do I prevent the AnyTrackClick idfrom displaying in the Cart line items?_hiddenPropertyName) will be hidden from customers at checkout. If your theme does not follow this best practice, it will result in the_atclidbeing shown during the checkout. Follow these instructions to adjust your code.
  "properties": [
        {
          "name": "_atclid",
"value": "Q6Pr5uPG5w3uHpsft9m2iHwAjMkfi3pm6l"-
The Conversion Name is not what I am expecting, how do I change it?Warning:
Update the mapping ONLY if you know what you're doing and what you're expecting on your ad platform's event manager.
You can update the Event Mapping in the Integration page, but this is not recommended as the standard events configured in the integration are mapped to standard events in your Ad Platforms.
Take these steps to troubleshoot errors you encounter in AnyTrack
Default settings = SuccessBased on thousands of integrations with Shopify, if you've followed the instructions and applied the default integration settings, you will not experience issues.
-
General troubleshooting
- Check that the AnyTrack tag is in the
headsection of your shop. - If you're on the free plan, check the monthly traffic limit in the billing section.
- The free plan does not include Conversion API for any Ad platforms.
- You've followed the default settings.
- Check that the AnyTrack tag is in the
-
Tracking errors can happen if the visitor blocks javascript on their browser, or prevents tracking pixels (small pieces of code that collect user data) from loading.What are the Errors displayed in the Integration logs? -
You will have different metrics between Shopify Analytics and AnyTrack. This is an inherent part of the analytics industry. While it seems simple, all analytics are affected by many factors such as browsers, regulations, ad blockers, counting methods, aggregation methods and reporting interfaces.Why are there discrepancies between Shopify and AnyTrack?
Yet, since AnyTrack's approach leverages both Client Side and Server Side tracking, it constantly enriches and collects data, regardless of the tracking limitations of browsers.
There are many possible reasons for differences in tracking results:- Differences in how sessions are defined. For example, some analytics software counts search bots as visitors, while other software doesn't.
- Google can only count visitors with JavaScript and cookies (small data files stored on user devices) enabled. Some visitors might not allow cookies or JavaScript.
- Customers can use browser extensions to block Google Analytics from tracking their sessions and purchases.
- Discrepancies might occur because of different reporting time zones. It's unlikely that identical tracking mechanisms are being used by each of the services, so your visitors aren't recorded equally.
Updated 6 days ago
