
Install AnyTrack Tag
Install the AnyTrack Tracking Tag on any website. Covers the platform integrations to check first, Google Tag Manager, website builders, direct code installation, verification, and troubleshooting.
This guide shows how to install the AnyTrack Tracking Tag on your website with Google Tag Manager, a website builder, or custom code.
Overview
Section titled “Overview”The AnyTrack Tracking Tag is a JavaScript snippet that you add to every page of your website. It opens sessions, collects traffic source data such as UTM parameters and ad click IDs, and tracks browser events such as PageView, FormSubmit, and OutboundClick.
AnyTrack uses this data to attribute the conversions your conversion sources send. On Starter and above, AnyTrack also sends those conversions to your connected ad platforms through the Conversion API.
Prerequisites
Section titled “Prerequisites”Before installing AnyTrack on your website, ensure you have:
- Active AnyTrack account with a created Property (Create a Property)
- Website administrator access to add code or install plugins
- Your AnyTrack Property ID (found in Property Settings > Tracking Script tab)
- List of existing tracking tools currently installed on your site
Check for Native Integrations First
Section titled “Check for Native Integrations First”Before you use the universal installation methods below, check if your platform has a dedicated integration, such as Shopify, WooCommerce, or HighLevel. Some platforms require their integration.
eCommerce Platforms (Required Integrations)
Section titled “eCommerce Platforms (Required Integrations)”| Platform | Required Integration | Why It’s Required |
|---|---|---|
| Shopify | Shopify Integration | Automatic conversion tracking, product data, customer information |
| WooCommerce | WooCommerce Plugin | Backend conversion tracking, order data, customer profiles |
| WordPress | WordPress affiliate plugin | If you are an affiliate marketer, you should use the plugin. |
Website Builders with Native Support
Section titled “Website Builders with Native Support”| Platform | Dedicated Guide | Benefits |
|---|---|---|
| WordPress | WordPress Integration Options | Plugin-based installation, automatic event tracking |
| ClickFunnels | ClickFunnels Integration | Funnel-specific tracking, conversion optimization |
| GoHighLevel | HighLevel Integration | Form tracking, workflow integration |
When to Use Universal Methods
Section titled “When to Use Universal Methods”Continue with the universal installation methods below if your platform is:
- Custom-built websites
- Website builders without native integrations (Wix, Webflow, Squarespace, etc.)
- Content management systems other than WordPress
- Static websites or landing pages
Universal Installation Methods
Section titled “Universal Installation Methods”Choose the installation method that best fits your technical comfort level and website setup:
Method 1: Google Tag Manager (Recommended for Most Users)
Section titled “Method 1: Google Tag Manager (Recommended for Most Users)”Best for: Professional setups, multiple tracking tools, team collaboration, non-eCommerce sites
Not suitable for: WooCommerce stores (must use WooCommerce plugin instead)
Why Choose GTM?
Section titled “Why Choose GTM?”- Centralized tag management
- No direct code editing required
- Version control and testing capabilities
- Team collaboration features
- Easy to add additional tracking tools later
Option A: Automatic Install from the AnyTrack Wizard (Easiest)
Section titled “Option A: Automatic Install from the AnyTrack Wizard (Easiest)”The AnyTrack onboarding wizard can install the Tracking Tag in your GTM container for you. This method requires a GTM container that is already installed on your website. If you do not have one yet, set up GTM first or use one of the other installation methods.
Select Install via Google Tag Manager in the wizard, sign in with the Google account that has access to your GTM container, and choose the GTM account, container, and workspace. AnyTrack adds the Tracking Tag, preconfigured with your Property ID, and publishes the container through the GTM API. No manual GTM configuration is needed.
See the step-by-step guide: Install Automatically from the AnyTrack Wizard.
Option B: Manual Step-by-Step GTM Installation
Section titled “Option B: Manual Step-by-Step GTM Installation”Use this method if you prefer to configure GTM yourself, or if your Google account does not have permission to publish the container.
-
Access Google Tag Manager
- Go to Google Tag Manager
- Create a new container or open your existing one
-
Add AnyTrack Template
- Click “Tags” → “New”
- Click “Tag Configuration”
- Select “Discover more tag types in the Community Template Gallery”
- Search for “AnyTrack” and select the official template
- Click “Add to workspace”
-
Configure AnyTrack Tag
- In Tag Configuration, select “AnyTrack”
- Enter your Property ID from AnyTrack dashboard
- Name your tag (e.g., “AnyTrack - All Pages”)
-
Set Trigger
- Click “Triggering”
- Select “All Pages” trigger
- Save the tag
-
Publish Container
- Click “Submit” → “Publish”
- Add version notes and publish
-
Install GTM Container on Website
- Copy your GTM container code
- Add it to your website’s
<head>section (or use your platform’s GTM integration)
Verification for GTM
Section titled “Verification for GTM”- Use AnyTrack Pixel Helper to verify tag loading
- Check GTM Preview mode to confirm that the AnyTrack tag triggers on every page
- Open the Conversions Report and confirm that
PageViewevents arrive
Complete GTM Guide: Google Tag Manager Integration
Method 2: Website Builder Manual Installation
Section titled “Method 2: Website Builder Manual Installation”Best for: Website builders, simple sites, users comfortable with basic code placement
Supported platforms: Wix, Webflow, Squarespace, Carrd, Leadpages, and most website builders
Step-by-Step Manual Installation
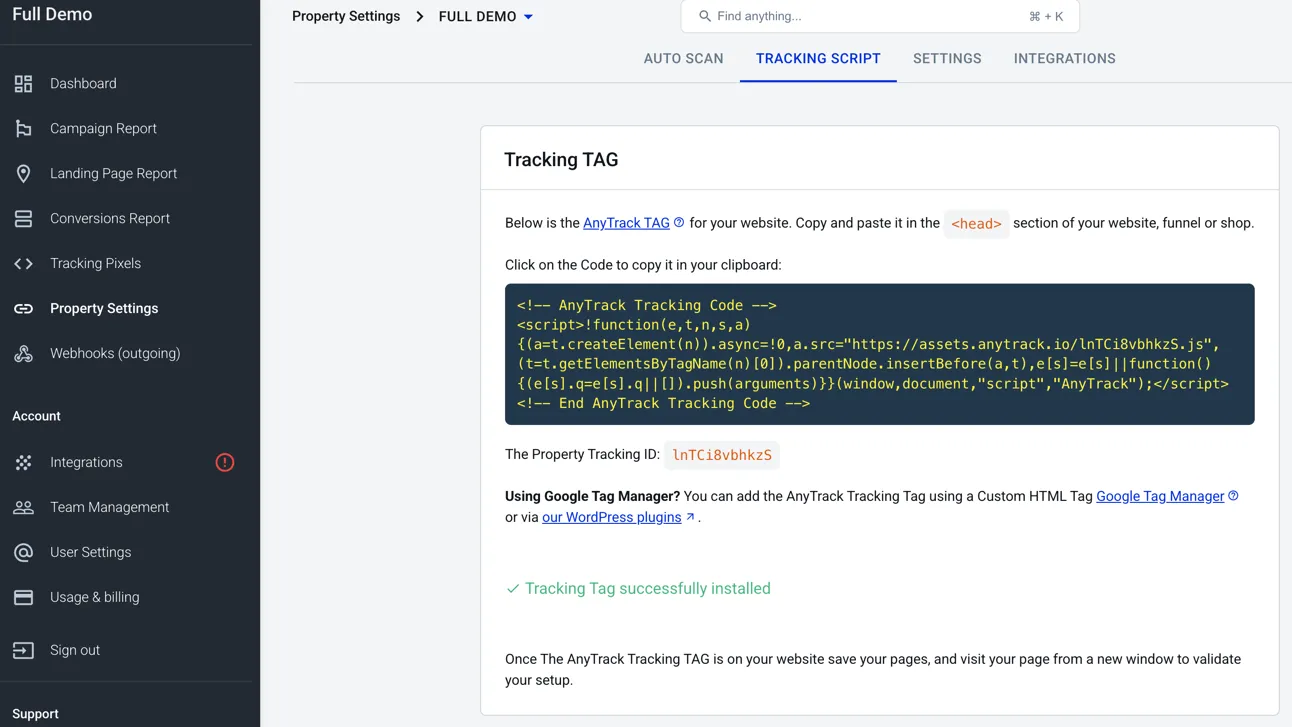
Section titled “Step-by-Step Manual Installation”- Get Your Tracking Script
- Log into AnyTrack dashboard
- Navigate to Property Settings → Tracking Script tab
- Copy your unique tracking script
-
Find Code Injection Area
Platform-Specific Locations:
Platform Location Instructions Wix Settings → Marketing Tools → Custom Code Paste in “Head” section, apply to “All Pages” Webflow Project Settings → Custom Code Paste in “Head Code” field Squarespace Settings → Advanced → Code Injection Paste in “Header” field Carrd Site Settings → Code → Head Available in Pro plans only Leadpages Page Settings → Tracking Codes Add to each page individually -
Paste Tracking Script
- Place the script in the
<head>section - Apply to all pages (site-wide setting when available)
- Save and publish changes
- Place the script in the
Example Tracking Script
Section titled “Example Tracking Script”<script>! function(e, t, n, s, a) { (a = t.createElement(n)).async = !0, a.src = "https://assets.anytrack.io/XXXXXXXXX.js", (t = t.getElementsByTagName(n)[0]).parentNode.insertBefore(a, t), e[s] = e[s] || function() { (e[s].q = e[s].q || []).push(arguments) }}(window, document, "script", "AnyTrack");</script>Verification for Manual Installation
Section titled “Verification for Manual Installation”- Open your website in a private/incognito window
- Install and use AnyTrack Pixel Helper Chrome Extension
- Check that the extension icon turns blue (indicating AnyTrack is detected)
- Open the Conversions Report and confirm that
PageViewevents arrive
Complete Website Builder Guide: Website Builders Integration
Method 3: Direct Code Installation
Section titled “Method 3: Direct Code Installation”Best for: Custom websites, full control environments, developers
Technical requirement: Direct access to website’s HTML files or theme files
Step-by-Step Direct Installation
Section titled “Step-by-Step Direct Installation”-
Access Website Files
- Via FTP, hosting control panel, or CMS theme editor
- Locate the main template file (usually
header.php,index.html, or main template)
-
Locate the
<head>Section- Find the opening
<head>tag - Place cursor just after
<head>or before</head>
- Find the opening
-
Insert Tracking Script
- Paste your complete AnyTrack tracking script
- Ensure it loads on all pages of your website
-
Save and Test
- Save file changes
- Clear any caching
- Test using verification steps below
Custom Implementation Notes
Section titled “Custom Implementation Notes”- Single Page Applications (SPA): The Tracking Tag fires a PageView on each route change automatically. See Single Page App Tracking for forms and conversion events.
- Server-Side Rendering: Ensure script loads in browser environment
- Content Security Policy: Add AnyTrack domains to CSP if applicable
Post-Installation Verification & Testing
Section titled “Post-Installation Verification & Testing”Regardless of installation method, always verify your setup:
1. Install AnyTrack Pixel Helper
Section titled “1. Install AnyTrack Pixel Helper”- Add AnyTrack Pixel Helper Chrome Extension
- Visit your website
- Confirm extension icon turns blue
- Click extension to view tracking details
2. Check the Conversions Report
Section titled “2. Check the Conversions Report”- Open the Conversions Report in the AnyTrack Dashboard
- Browse your website in another tab
- Confirm that
PageViewevents arrive in near real time
3. Test Different Pages
Section titled “3. Test Different Pages”- Visit multiple pages on your website
- Confirm tracking works across your entire site
- Test on mobile devices if applicable
Common Issues & Solutions
Section titled “Common Issues & Solutions”| Issue | Cause | Solution |
|---|---|---|
| Extension doesn’t turn blue | Script not loading | Check code placement, clear cache |
| Intermittent tracking | Caching issues | Clear website and browser cache |
| Mobile not tracking | Responsive template issues | Test on actual mobile devices |
| No data in dashboard | Incorrect Property ID | Verify Property ID matches dashboard |
Critical Next Steps
Section titled “Critical Next Steps”1. Remove Duplicate Pixels After You Verify Delivery
Section titled “1. Remove Duplicate Pixels After You Verify Delivery”AnyTrack loads the pixels of your connected ad platforms. On Starter and above, after you verify delivery to a platform, remove the direct installations that send the same conversions to it. Direct installations of the same pixel cause duplicate events, poor match rates, and inaccurate attribution. Step 7 of the Setup Guide gives the full procedure.
Direct installations to remove after verification:
- Facebook Pixel (Meta Pixel) code installed directly on the site
- Google Analytics tags installed directly on the site, if you use the AnyTrack GA4 integration
- Other conversion tags of ad platforms that you connected in AnyTrack
- Plugins that install their own pixel, such as Facebook for WooCommerce
2. Finish the Setup
Section titled “2. Finish the Setup”The Tracking Tag collects clicks and browser events. To track and attribute conversions, finish Steps 3 to 5 of the Setup Guide:
- Add the UTM tracking template to your ads.
- Connect your ad platforms. On Starter and above, AnyTrack sends them conversions through the Conversion API.
- Connect your conversion sources from the Integration Catalog.
Advanced Configuration Options
Section titled “Advanced Configuration Options”Cross-Domain Tracking
Section titled “Cross-Domain Tracking”If your website spans multiple domains (e.g., separate checkout domain):
Custom Event Tracking
Section titled “Custom Event Tracking”For tracking specific actions beyond standard events:
AutoTrack & AutoTag Features
Section titled “AutoTrack & AutoTag Features”Understanding automatic tracking capabilities:
- AutoTrack: Automatically tracks form submissions and outbound clicks
- AutoTag: Automatically adds tracking parameters to affiliate and external links
- Learn more about the AnyTrack Tag
Troubleshooting & FAQ
Section titled “Troubleshooting & FAQ”Tag Not Loading Issues
Section titled “Tag Not Loading Issues”Symptoms: AnyTrack Pixel Helper doesn’t detect tag, no data in dashboard
Solutions:
- Check script placement: Must be in
<head>section, not<body> - Clear all caches: Website cache, CDN cache, browser cache
- Verify Property ID: Ensure ID in script matches your AnyTrack Property
- Check for JavaScript errors: Use browser developer tools console
- Test in incognito mode: Rules out browser extension conflicts
Conflicts with Existing Tracking
Section titled “Conflicts with Existing Tracking”Symptoms: Inconsistent data, duplicate events in ad platforms
Solutions:
- Remove duplicate pixel installations: On Starter and above, after you verify AnyTrack delivery, remove direct installations of the same ad platform pixel. On Free, keep them.
- Disable conflicting plugins: Temporarily disable to identify conflicts
- Check GTM container: Ensure no duplicate AnyTrack tags
- Review Meta Events Manager: Confirm that each conversion event comes from one source
Browser Privacy Settings Impact
Section titled “Browser Privacy Settings Impact”Symptoms: Reduced tracking in certain browsers (Safari, Brave, Firefox)
Understanding:
- Privacy-focused browsers can block client-side tracking
- This affects all tracking platforms, not just AnyTrack
- Server-side conversion tracking (via integrations) remains unaffected
When to Contact Support
Section titled “When to Contact Support”Contact AnyTrack Support if:
- Tag appears to load but no data in dashboard after 24 hours
- Receiving error messages in browser console
- Platform-specific installation issues
- Integration conflicts you can’t resolve
- Custom implementation requirements
Before contacting support:
- Complete all verification steps in this guide
- Test in multiple browsers and devices
- Check browser developer console for errors
- Note your website platform and any error messages
Next Step
Section titled “Next Step”Once the Tracking Tag loads on every page, connect your ad platforms and conversion sources. The Setup Guide walks you through both.