Custom Event Tracking
Learn how to track custom events like button clicks, form views, and video plays using the AnyTrack Event Snippet. Covers the trigger command, standard and custom event names, event attributes for enriching conversion data, automatic event mapping to ad platforms, and validation using the Tracking Tag Helper extension.
Custom events are user-defined tracking events specific to a property’s goals — beyond AnyTrack’s standard events like Purchase, Lead, or ViewContent. They let you track unique actions such as button clicks, video plays, scroll depth, or quiz completions, then send that enriched data to all connected ad platforms via Conversion API for attribution, audience building, and campaign optimization.
Custom events give you complete control over what gets tracked and when, so ad platforms receive the exact signals they need to optimize performance.
The Trigger Command
Section titled “The Trigger Command”Every AnyTrack event snippet has three parts:
- The Trigger: The command that generates the event.
- The Event Name: Standard event (like
ViewContent,Lead,Purchase) or custom event name. - The Event Attributes: Customer data (email, phone), product details (SKU, value, currency), and other context that enriches your tracking. See the complete list of Event Attributes.
<script> var click_id = AnyTrack('trigger', 'ViewContent', { brand: 'Nike', label: 'shoes', value: 199.00, currency: 'USD' });</script>Trigger Custom Events
Section titled “Trigger Custom Events”Use custom event names when standard events don’t match your tracking needs:
<script>var click_id = AnyTrack('trigger', 'Optin');</script>Conversion Event Mapping
Section titled “Conversion Event Mapping”Standard events are automatically forwarded to ad platforms. Custom events require manual mapping — follow our guide to map custom events to your ad platforms so platforms can use them for optimization.
Event Attributes
Section titled “Event Attributes”Send customer data and product details with every event to boost Event Match Quality and give ad platforms the rich signals they need to optimize effectively. Higher Event Match Quality means better attribution, smarter targeting, and improved ROAS.
<script>var click_id = AnyTrack('trigger', 'Optin', { formId: 'form82323', brand: 'newsletter', email: 'jondoe@email.com'});</script>Attributes like email, phone, value, currency, and transaction_id flow to AnyTrack and all connected ad platforms, giving you consistent, enriched data everywhere.
See all supported Event Attributes.
Validate Your Custom Events
Section titled “Validate Your Custom Events”Catch tracking issues before they cost you money. Validation takes 30 seconds using the Tracking Tag Helper Chrome Extension.
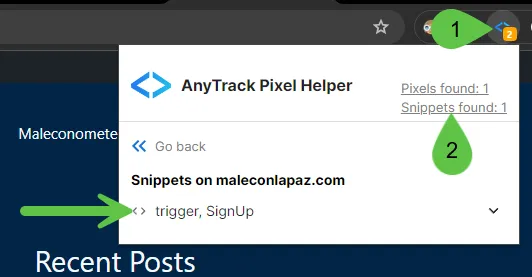
Step 1: Verify the snippet is found
Navigate to the page where you added the snippet, open the Tracking Tag Helper Chrome Extension, and click “Snippets found.” Your custom event snippet should appear in the list.
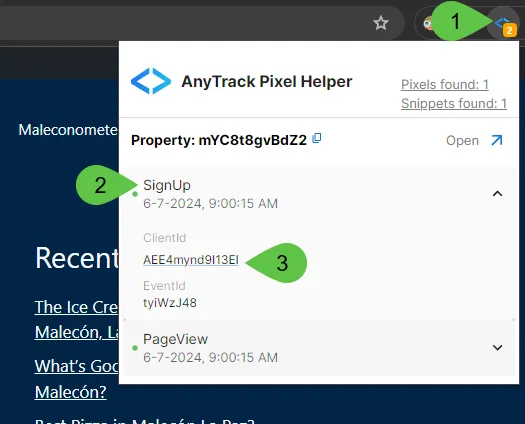
Step 2: Confirm the event fired
On the same page, check the Tracking Tag Helper again. A green checkmark with timestamp means the event triggered successfully. Click the ClientId link to view details.
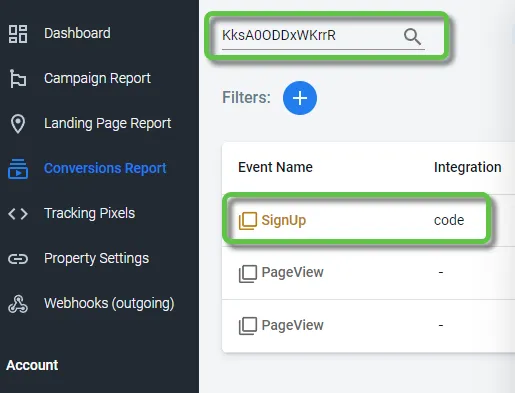
Step 3: Review in Conversion Report
The ClientId link opens the Conversion Report showing your triggered event. Verify the event data looks correct, then map the event to your connected ad platforms so they can receive and use the conversion signals.
Troubleshooting: Event Not Triggering
Section titled “Troubleshooting: Event Not Triggering”If the Tracking Tag Helper shows both the Tag and the event snippet are installed but the event is not firing, the snippet is likely executing before the Tag finishes loading. This commonly happens when the Tag loads through a tag manager.
Solution 1: Configure your tag manager to fire the event snippet after the Tracking Tag loads completely.
Solution 2: Install the Tracking Tag directly in your page <head> section instead of through a tag manager — this guarantees it loads before your event snippets.
Solution 3: Add a delay to the snippet, giving the Tag time to load:
<script> var delay = 2000; // Delay in milliseconds (2 seconds) function triggerAnyTrack() { var click_id = AnyTrack('trigger', 'SignUp'); } setTimeout(triggerAnyTrack, delay);</script>FAQ & Troubleshooting
FAQ was last reviewed on 2026-07-15