Klaviyo Integration
Get answers about klaviyo. Understand the key concepts and how they apply to your conversion tracking setup for optimal performance and tracking accuracy.
Whether email marketing is part of your omnichannel marketing strategy or it’s the core of your business, tracking beyond your open and click-through rate is key to your business growth.
The Tracking and Attribution Challenge
Section titled “The Tracking and Attribution Challenge”When you acquire your customers through paid media campaigns, your goal is to drive maximum ROAS to your campaigns. Yet, when email marketing is part of your marketing, the customers acquired through paid ads will hopefully come back to your shop via your email campaigns, promotions, and loyalty programs.
In these marketing scenarios, the repeat purchases will be attributed to your email campaigns rather than to your paid ads channels.
Over time, and if you are successful at your email marketing campaigns, the ratio of purchases attributed to your email campaigns, rather than your paid ad campaigns, will grow and will prevent you from clearly seeing the true ROAS of your paid ads.
How the Klaviyo AnyTrack integration solves this challenge
Section titled “How the Klaviyo AnyTrack integration solves this challenge ”Once you enable the integration, AnyTrack will attribute your subscribers according to their original ad campaign sources, and any subsequent conversions, regardless of when they happen, will be attributed and reported according to their original ad campaigns.
Setup instructions:
Section titled “Setup instructions:”Step #1: In Klaviyo navigate to the UTM Trackingsettings
Section titled “Step #1: In Klaviyo navigate to the UTM Trackingsettings”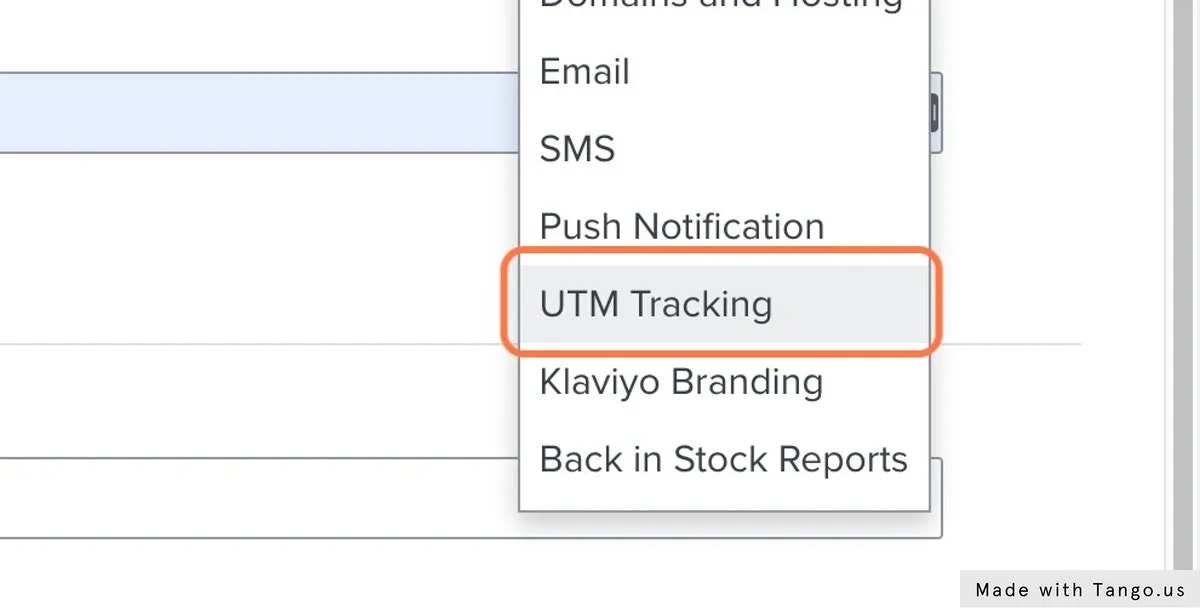
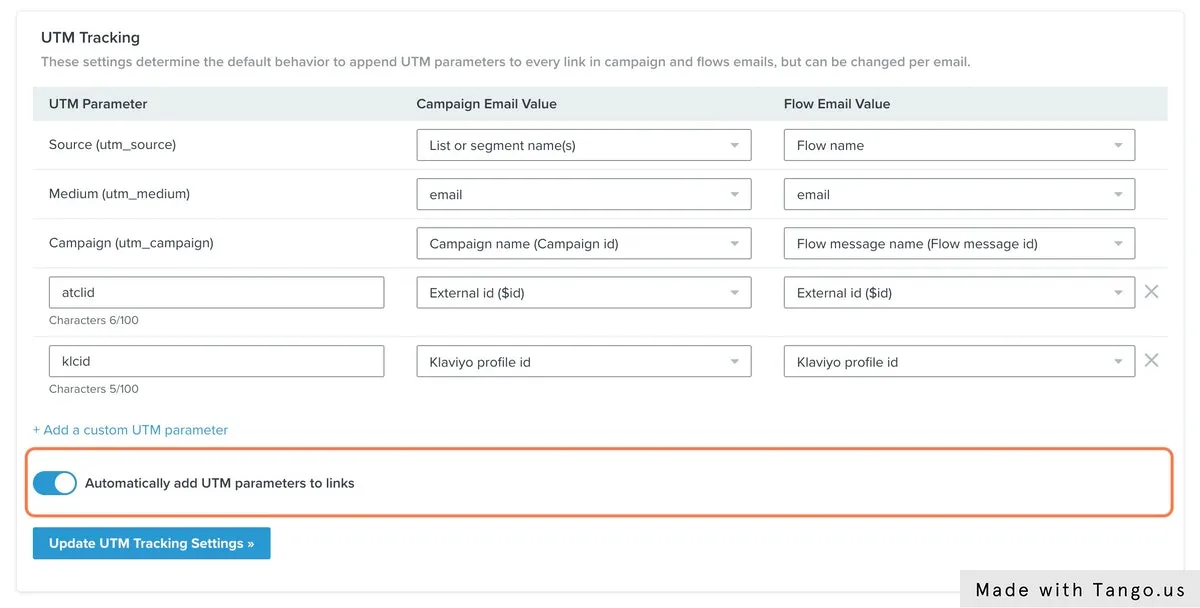
Step #2: Create the new parameters according to the illustration (below)
Section titled “Step #2: Create the new parameters according to the illustration (below)”-
AnyTrack tracking parameter:
Section titled “AnyTrack tracking parameter: atclid”atclid- Click on Add a custom UTM Parameter
- Set the UTM Parameter name to
atclid - Select the Campaign Email Value:
External id ($id) - Select the Flow Email Value:
External id ($id)
-
Klaviyo id parameter:
Section titled “Klaviyo id parameter: klcid”klcid- Click on Add a custom UTM Parameter
- Set the UTM Parameter name to:
klcid - Select the Campaign Email Value:
Klaviyo Profile ID - Select the Flow Email Value:
Klaviyo Profile ID
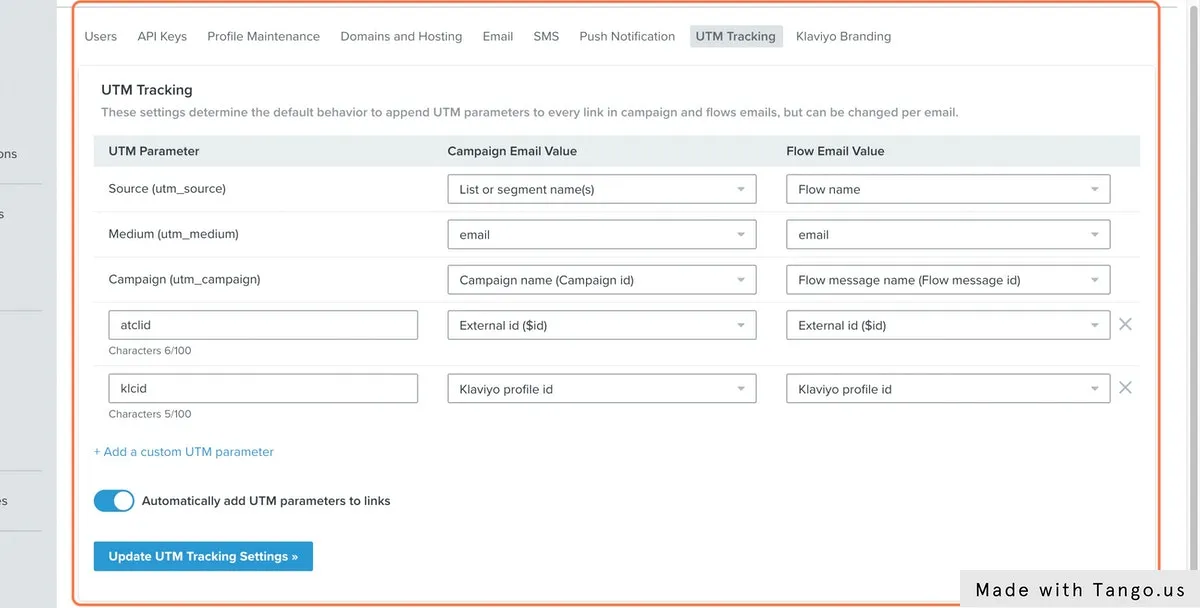
-
Enable the option Automatically add UTM parameters to links
Section titled “Enable the option Automatically add UTM parameters to links”
https://trafficker.io/?utm_source=Validation%20List&utm_medium=email&utm_campaign=Email%20Campaign%202022-02-09%2011%3A27%3A59%20%28WdtdaU%29&atclid=NhxpyvtKqj4LHWztCo7OWsSAbai9bMhSMa&klcid=01FVF08F97FWFPNTF3QA9HE2A0&_kx=T1KE0FgC53Gam3d7suloSQsGG6dUsEpupU1V_20OP2M%3D.XMEqABStep #3: Navigate to the Klaviyo API settings
Section titled “Step #3: Navigate to the Klaviyo API settings”- Create a new API Key
- Reveal the key and copy it (you will need it in the following steps)
Step #4: Add the Google Tag Manager container to your website
Section titled “Step #4: Add the Google Tag Manager container to your website”This step is required if you have published Klaviyo forms on your website and visitors are subscribing to your Klaviyo account prior to making a purchase.
Step #5: Install the GTM Container
Section titled “Step #5: Install the GTM Container”- Download the GTM container template.
- Import the container into your Google Tag Manager workspace.
- Update the AnyTrack Property ID with your property id.
- Submit your new container.
Step #6: Request the integration
Section titled “Step #6: Request the integration”Once you have followed the instructions, you can request the integration using this form.
- Provide the
PropertyIDfor which this integration will be activated - How to find mypropertyId - Provide the Klaviyo API Key you created in Step #3
- Provide the Klaviyo List ID against which AnyTrack will validate and update the subscribers
- We recommend creating a new list for this specific purpose.
- Make sure this is not a Segment ID, or the validation will fail.
Validate your integration
Section titled “Validate your integration”- Go through your funnel using a clean browser (clean of Klaviyo cookies)
- Once you subscribe to your list you should see the
external_idset under the new subscribers. - Trigger an email from Klaviyo.
- Click on the email and inspect the landing page URL to see if the tracking parameters were appende
Related Resources
Section titled “Related Resources”FAQ and troubleshooting
Section titled “FAQ and troubleshooting”-
Not currently, but any subscriber landing on your website from Klaviyo campaigns will be automatically tagged.
Can I update past subscribers with the AnyTrack tracking id?
Section titled “Can I update past subscribers with the AnyTrack tracking id?” -
Yes. Since the integration is built around anonymous identifiers, AnyTrack can update the subscribers without the need of the subscriber email address.
Can this integration be implemented for Affiliate Marketers?
Section titled “Can this integration be implemented for Affiliate Marketers?”