Checkout Champ
Learn how to integrate Checkout Champ with AnyTrack using Postback Export Profiles and Tracking Tags. Collect UTMs, click IDs, and send conversion events automatically.
Overview
Section titled “Overview”Checkout Champ conversions happen server-side, where browser Tracking Tags can’t see them. When customers complete purchases, Facebook receives zero conversion signals—your ads look like they’re failing when they’re actually driving sales, so the algorithm stops optimizing and your cost per acquisition climbs.
This guide connects Checkout Champ conversions to AnyTrack using server-side postbacks and client-side Tracking Tags together. Postbacks send purchase data from Checkout Champ’s backend (bypassing ad blockers), while Tracking Tags track the landing page visit (collecting UTM parameters and Click IDs that connect sales back to specific ads). Combined tracking delivers complete attribution and higher Event Match Quality.
Why Use Both Tracking Methods?
Section titled “Why Use Both Tracking Methods?”Combining postback and Tracking Tag gives you the best of both worlds:
- Higher Match Rates: Server-to-server postbacks don’t rely on browser loading, ensuring more conversions reach your ad platforms
- Real-Time Data: Postbacks send conversion data instantly without waiting for customer actions
- Deduplication Support: AnyTrack automatically prevents double-counting when both methods send the same conversion
- Better ROAS: More accurate data leads to better ad optimization and higher returns
- Cross-Channel Attribution: Track customers across different devices and sessions
Step 1 – Pass Custom Parameters from URL
Section titled “Step 1 – Pass Custom Parameters from URL”Checkout Champ lets you store custom parameters from the checkout URL directly onto an order. AnyTrack calls this “AutoTag” - it collects the AnyTrack Click ID and appends it to your checkout URL.
Add the Click ID parameter to your checkout URL like this:
https://checkout.yourwebsite.foo/checkout?cc_custom_click_id=--CLICK-ID--How it works:
cc_custom_[name]tells Checkout Champ to store the value in the order record--CLICK-ID--is a placeholder that AnyTrack’s tracking tag replaces automatically- The stored value
[cc_custom_click_id]becomes available for postback exports
👉 Hover on this Checkout Champ link to see the click_id value generated by the AnyTrack Tag.
Update the checkout URL destination
Section titled “Update the checkout URL destination”- Edit your landing page call-to-action URL that points to the Checkout Champ checkout page
- Add
cc_custom_click_id=--CLICK-ID--to the checkout URL
- Save your page
Step 2 – Create a Custom Conversion Source in AnyTrack
Section titled “Step 2 – Create a Custom Conversion Source in AnyTrack”Create a Custom Conversion Source in AnyTrack to generate the postback URL template.
- Go to AnyTrack → Integrations → Custom Sources
- Click ➕ New Source and name it
Checkout Champ - Fill in the Connection Settings using Checkout Champ’s parameters:
| AnyTrack Field | Checkout Champ Placeholder | Description |
|---|---|---|
| Sub ID / Click ID Placeholder | [cc_custom_click_id] | Collects the AnyTrack Click ID from the checkout URL |
| Commission / Payout Placeholder | [orderAmount] | Sends the order value or revenue amount |
| Transaction ID Placeholder | [orderId] | Unique order identifier |
| Product / Brand Name | [campaignName] or [productName] | Optional: Funnel or product name |
| Timestamp of Event | [orderDateTimestamp] | Optional: Order creation timestamp |
After saving, AnyTrack generates a postback URL like this:
https://t1.anytrack.io/<ACCOUNT_ID>/collect/?click_id=[cc_custom_click_id]&value=[orderAmount]&transactionId=[orderId]¤cy=[orderCurrency]&event_name=PurchaseStep 3 – Create a Postback Export Profile
Section titled “Step 3 – Create a Postback Export Profile”- In Checkout Champ, navigate to ADMIN → EXPORTS
- Click the green ”+” button to create a New Export Profile
- Choose Postback as the export type
- Set a profile name, e.g.,
AnyTrack S2S
General Settings Example:
| Field | Value |
|---|---|
| Profile Name | AnyTrack Postback |
| Export Type | Postback |
| Postback URL | Paste the URL generated from AnyTrack |
| Export Delay | 0–15 min (recommended) |
Step 4 – Map Standard Fields to AnyTrack Parameters
Section titled “Step 4 – Map Standard Fields to AnyTrack Parameters”In the Field Mappings section, click ”+” to add new fields.
Use the following mapping table:
| AnyTrack Parameter | Checkout Champ Field | Type | Example Value |
|---|---|---|---|
event_name | Static value | Static | Purchase |
click_id | [cc_custom_click_id] | Dynamic | a8f9b3c0d2... |
value | [orderAmount] | Dynamic | 79.00 |
currency | [orderCurrency] | Dynamic | USD |
transactionId | [orderId] | Dynamic | ORD-58322 |
email | [emailAddress] | Dynamic | john@example.com |
firstName | [firstName] | Dynamic | John |
lastName | [lastName] | Dynamic | Smith |
country | [country] | Dynamic | US |
state | [state] | Dynamic | CA |
city | [city] | Dynamic | Los Angeles |
zipcode | [zip] | Dynamic | 90045 |
shippingPrice | [shippingAmount] | Dynamic | 9.95 |
taxPrice | [taxAmount] | Dynamic | 2.75 |
Step 5 – Configure POST and JSON Format
Section titled “Step 5 – Configure POST and JSON Format”By default, webhooks are sent as GET requests. To send as POST (recommended):
- Add static headers as additional fields:
header:Content-Type = application/jsonheader:httpMethod = POST
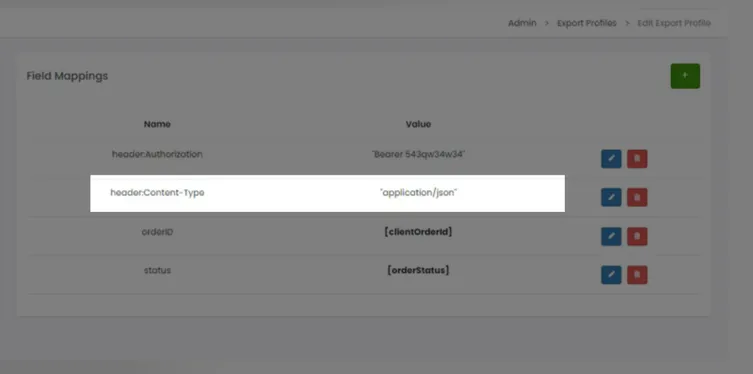
- Checkout Champ will automatically send the mapped fields as a JSON payload
Example JSON Payload Sent to AnyTrack:
{ "event_name": "Purchase", "click_id": "f8e3bf8dfba8b51ce3340", "email": "john@example.com", "firstName": "John", "lastName": "Smith", "value": 79.00, "currency": "USD", "transactionId": "ORD-58322", "country": "US"}Step 6 – Setup Profile Routing
Section titled “Step 6 – Setup Profile Routing”Profile routing defines which conversion types will fire the postback.
- Return to the Export Profiles list
- Under Profile Routing, click ”+”
- Select which event types trigger exports:
| Checkout Champ Event | Mapped AnyTrack Event | Details |
|---|---|---|
| New Sale | Purchase | A purchase event |
| Upsell | Upsell | An upsell |
| Subscription Started | subscription_start | |
| Partial | Lead | Leads that started checkout but didn’t complete it |
| Lead | Lead | Leads that haven’t started checkout (didn’t add a product to their cart) |
Step 7 – Verify Tracking
Section titled “Step 7 – Verify Tracking”- Go to AnyTrack → Event Debugger
- Complete a live (non-test card) checkout
- Verify that both:
- The Tracking Tag event fires on-page (client-side)
- The postback event appears in your AnyTrack logs (server-side)
Standard Parameters & Event Attributes Reference
Section titled “Standard Parameters & Event Attributes Reference”| AnyTrack Parameter | Type | Description |
|---|---|---|
event_name | string | Event type (Purchase, Upsell, etc.) |
click_id | string | AnyTrack Click ID |
value | number | Revenue amount |
currency | string | ISO currency code (e.g., USD, EUR) |
transactionId | string | Unique order ID |
email, firstName, lastName | string | Customer PII (Personal Identifiable Information) for match quality |
country, city, state, zipcode | string | Customer location data |
items | array | Product details |
shippingPrice, taxPrice | number | Optional checkout costs |
Troubleshooting Tips
Section titled “Troubleshooting Tips”| Issue | Possible Cause | Fix |
|---|---|---|
| Postback not firing | No routing configured | Check Profile Routing |
| No event in AnyTrack | Missing click_id | Ensure cc_custom_click_id is passed in URL |
| Event mismatch | Wrong case or spelling in parameters | Use exact AnyTrack parameter names |
| Events Log shows error | No matching clickid or refid parameters | The AnyTrack Tag is not set in the head section of each page of your funnel |
| Test orders missing | Checkout Champ test cards are excluded | Use live payment for testing |
Summary
Section titled “Summary”You’ve successfully connected Checkout Champ with AnyTrack using a hybrid tracking model:
- Client-Side (Tracking Tag): For pageview and AutoTag tracking parameters
- Server-Side (Postback): For real-time and rich conversion data from Checkout Champ backend
This setup ensures accurate match rates, better ROAS, and cross-channel attribution.
Related Resources
Section titled “Related Resources”Frequently Asked Questions
FAQ was last reviewed on 2026-07-27